Homeowner Tips
Practical advice for maintaining, protecting, and enjoying your home — one tip at a time.
Should You Have Your Air Ducts Cleaned?
If you've ever looked around your home and wondered where all that dust keeps coming from, you may have heard air duct cleaning mentioned as a possible solution. But is it something every homeowner needs?
The answer is: it depends.
Your home's ductwork serves as the pathway that carries heated and cooled air from your HVAC system to the rooms throughout your house. Over time, dust, pet hair, pollen, and other debris can accumulate inside those ducts.
While that may sound alarming, the reality is that duct cleaning is not considered routine annual maintenance for most homes. In many cases, a properly functioning HVAC system with regularly changed filters can keep things running efficiently without frequent duct cleaning.
That said, there are situations where duct cleaning may be worth considering.
When Duct Cleaning Makes Sense
You may want to explore duct cleaning if:
You've recently completed a remodeling or construction project.
You've moved into an older home and don't know the maintenance history.
You're noticing excessive dust throughout the home.
There are musty odors coming from your vents.
You've discovered evidence of pests in the ductwork.
A professional has identified mold growth within the ducts.
These situations can introduce debris or contaminants into the system that may justify a professional cleaning.
How Often Should Ducts Be Cleaned?
There isn't a one-size-fits-all schedule.
For many homeowners, cleaning every 5 to 10 years—if needed at all—is generally sufficient. Homes with multiple pets, smokers, significant allergy concerns, or frequent renovation projects may benefit from more frequent evaluations.
Rather than following a strict timetable, it's usually better to look for signs that cleaning may be warranted.
The Most Important Maintenance Step
If you're looking for the best way to keep your HVAC system and ductwork cleaner, start with your furnace filter.
Changing your furnace filter regularly helps capture dust and airborne particles before they circulate through your home. It's one of the simplest and most cost-effective maintenance tasks a homeowner can perform.
The Bottom Line
Duct cleaning can be beneficial in certain circumstances, but it's not something every homeowner needs on a regular basis. If you're experiencing excess dust, odors, or have recently completed a major remodeling project, it may be worth discussing with a qualified HVAC professional.
Disclaimer: This article is for general homeowner education and is not intended as HVAC or indoor air quality advice. Consult a qualified HVAC professional regarding your home's specific needs.
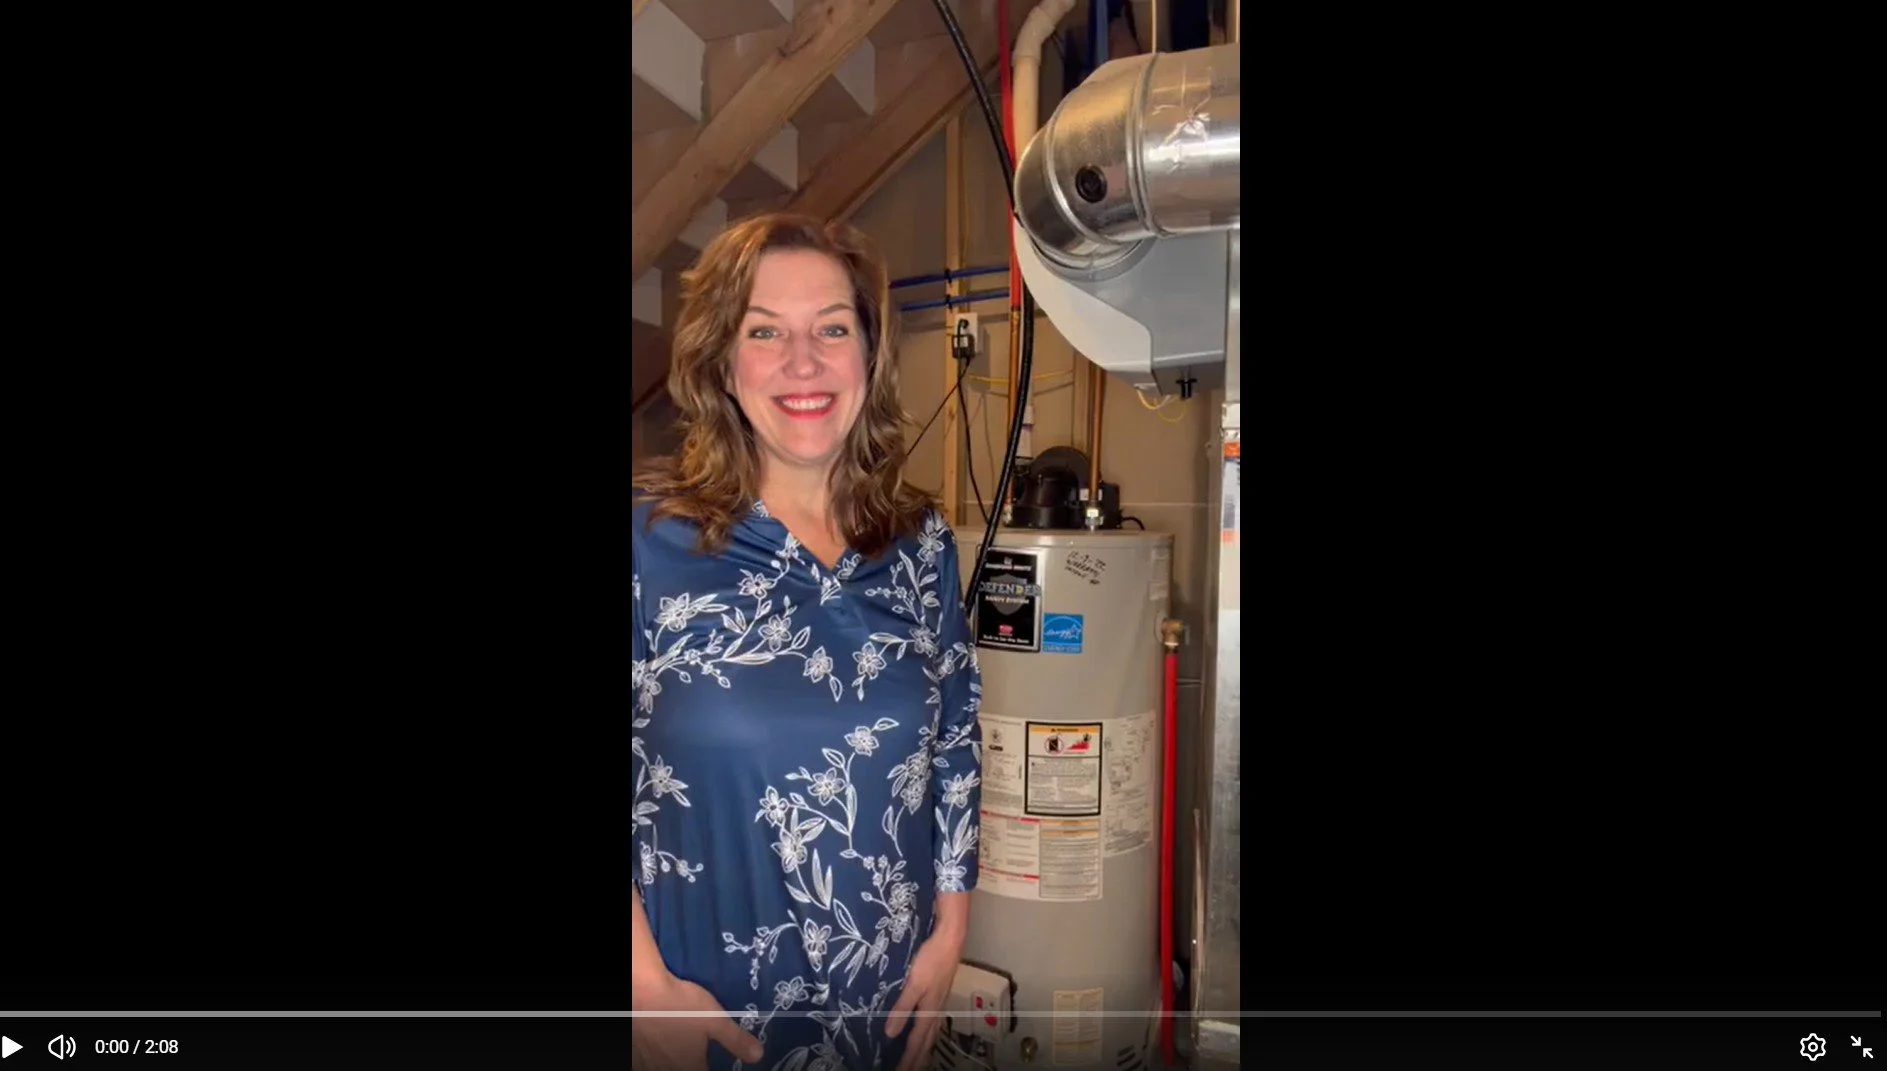
How to Make Your Water Heater Last Longer (and Avoid a Costly Surprise)
Most homeowners don’t think about their water heater… until something goes wrong.
Hot water is just there when you need it—until one day it isn’t.
I had my plumber out this week to drain my water heater, and it was a great reminder that this is one of those simple maintenance items that can make a big difference in your home.
🔧 What Your Water Heater Is Actually Doing
Your water heater is working behind the scenes every day, heating and storing water so it’s ready when you turn on a faucet, take a shower, or run your dishwasher.
Most homes have a traditional tank-style water heater that keeps a supply of hot water ready at all times.
⏳ How Long Do They Last?
A typical water heater lasts about 8–12 years.
That means if yours is getting up there in age, it’s worth paying attention to how it’s performing—and making sure it’s being maintained.
Because when they go, they tend to go quickly.
💰 Why Maintenance Matters
Replacing a water heater isn’t cheap. Most homeowners can expect to spend $1,500–$3,500 or more depending on the type and installation.
The good news? A little routine maintenance can help extend its life and improve efficiency.
🧰 The One Thing You Should Be Doing (But Probably Aren’t)
The most important maintenance item is an annual drain and flush.
Over time, minerals from your water settle at the bottom of the tank. That buildup forces your water heater to work harder and can shorten its lifespan.
Flushing the tank clears that sediment out and helps everything run more smoothly.
✔️ A Few Other Simple Tips
In addition to flushing the tank, here are a few other things to keep in mind:
Check the anode rod every few years – this helps prevent the tank from rusting from the inside
Keep the temperature around 120°F – hot enough for comfort, but safer and easier on the system
Take a quick look occasionally – watch for rust, corrosion, or small leaks before they become big issues
🚨 Warning Signs to Watch For
Your water heater will usually give you clues before it fails. Keep an eye out for:
Water not getting as hot as it used to
Running out of hot water more quickly
Rumbling or popping noises
Rusty or discolored water
Any moisture or leaking around the base
If you notice any of these, it’s a good idea to have it checked sooner rather than later.
💡 Final Thought
This is one of those small, easy-to-overlook maintenance items that can have a big impact on your home.
A simple yearly service can help your water heater last longer, run more efficiently, and help you avoid an unexpected (and expensive) replacement.
If you haven’t had yours serviced in a while, it might be time to add it to your list.
What I Learned From a Kitchen Fire (And What Every Homeowner Should Have)
Last weekend, I had a small fire in my oven.
It started quickly and could have escalated just as fast—but thankfully, I had a fire blanket hanging right in my kitchen. I pulled it down, covered the flames, and it was out within seconds.
No damage, no lingering mess, and no panic once it was handled.
It was a good reminder of something we don’t often think about: most of us have smoke detectors in place, but we don’t always have a clear plan—or the right tools—for what to do if a fire actually starts.
Why a Fire Blanket Matters
Fire blankets are designed to smother flames by cutting off the oxygen supply. They’re especially effective for small, contained fires—like the kind that can happen on a stovetop or in an oven.
What I appreciated most in that moment:
It was simple to use
It worked immediately
There was no cleanup afterward
Fire extinguishers absolutely have their place, but for a small kitchen fire, a fire blanket can be a very practical first response.
A Simple Step for Homeowners
As homeowners, we tend to focus on maintenance projects—furnaces, roofs, landscaping—but safety tools like this are easy to overlook.
A fire blanket is:
Affordable
Easy to store (many come in small wall-mounted pouches)
Something you hope you never need—but are very glad to have if you do
Keeping one within reach of your kitchen is a small step that can make a big difference.
A Quick Reminder
Fire blankets and extinguishers are meant for small, manageable fires only. If a fire is spreading or you’re unsure, the priority is always to get out safely and call for help.
How to Keep Birds Off Your Porch (Simple Fix That Works)
If you have a front porch, deck, or railing that birds like to sit on, you know how quickly the mess can build up. Besides not looking great, bird droppings can stain surfaces and make your entryway feel dirty even when the rest of your home is clean.
I recently ran into this problem on my own front porch. Mourning doves had decided it was the perfect place to hang out, and I was constantly cleaning up after them.
Instead of using anything harmful, I tried a simple reflective bird deterrent. These are lightweight hanging strips that move in the wind and reflect light. The movement and flashing light make birds uncomfortable enough to stay away, but they don’t hurt them. They were inexpensive, easy to install, and they started working right away.
Small fixes like this are part of maintaining your home. When you stay on top of little issues, your house stays cleaner, looks better, and takes less effort to care for over time.
▶ Watch the video below to see how these bird deterrents work.
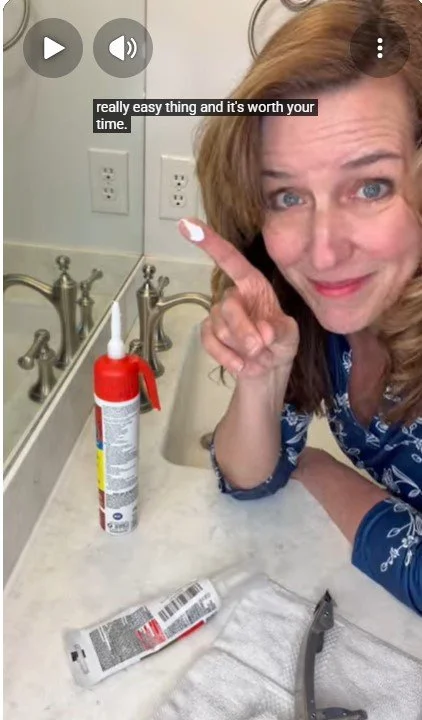
Why You Should Replace Cracked Caulk Around Your Sink
Caulk around sinks and countertops doesn’t last forever. Over time it can dry out, shrink, or crack. When that happens, water can begin to seep behind the sink or countertop where you can’t see it.
Even small amounts of moisture in those areas can cause problems over time, including damage to cabinets, deterioration of wood materials, and the potential for mold growth. The good news is that replacing old caulk is a simple home maintenance task that most homeowners can handle themselves.
In the video below, I walk through the basic steps for this project, including:
How to remove old, cracked caulk
How to apply new caulk for a clean, finished look
It’s a quick project that can help protect your cabinets and prevent more expensive repairs later.
Watch the video below to see the process step-by-step.
Maintaining small items like this around your home can go a long way toward protecting your property and avoiding bigger issues down the road.
Basement Clean-Out? Here’s How to Handle Old Paint the Right Way
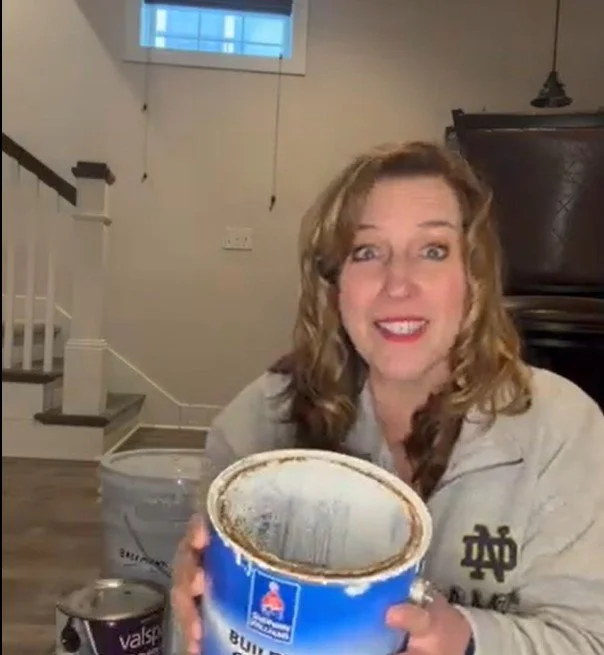
If you’re like most homeowners, you probably have a few half-used paint cans sitting in the basement, garage, or utility room.
The question is… what are you supposed to do with them?
Tossing liquid paint straight into the trash (or worse, pouring it down a drain) isn’t safe for your home or the environment. The good news is that disposing of old paint properly is simple once you know the steps.
Step 1: Determine If It’s Latex or Oil-Based
Most modern interior paint is latex (water-based), but older paint may be oil-based.
Latex paint can often be dried out and disposed of with regular trash.
Oil-based paint usually needs to be taken to a household hazardous waste facility.
If you’re unsure, check the label on the can.
Step 2: For Latex Paint — Let It Dry Completely
Latex paint must be completely solid before disposal.
You can:
Leave the lid off and let it air dry (small amounts)
Add cat litter, sawdust, or a commercial paint hardener to speed up the process
Once it’s fully hardened, you can dispose of it in your regular trash (with the lid off in many municipalities — check local guidelines).
Step 3: For Oil-Based Paint — Use a Hazardous Waste Drop-Off
Oil-based paints, stains, and solvents should be taken to a local household hazardous waste site. These facilities are equipped to dispose of materials safely.
A quick search for “household hazardous waste near me” will point you in the right direction.
A Quick Homeowner Tip
Before you dispose of a can, make sure you truly won’t need it again. Keeping a small, well-labeled container of leftover paint for touch-ups can save you time and money later.
Owning a home comes with lots of small responsibilities like this. My goal is to help you protect your investment long after closing day.
If you ever have questions about buying, refinancing, or maintaining your home, I’m always here as a resource.
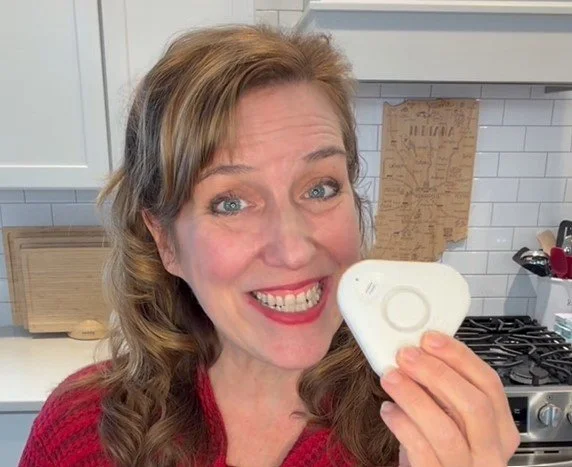
One Small Device That Can Prevent Big Water Damage
If there’s one thing I’ve learned after years of working with homeowners, it’s this: the biggest problems often start as small ones.
A slow drip under a sink.
A washing machine hose that loosens.
A water heater that starts leaking while you’re away for the weekend.
And before you know it… flooring, drywall, and cabinets are involved.
That’s why I want to share a simple tip that I recommend for every homeowner: water leak detectors.
What Is a Water Leak Detector?
A water leak detector is a small device that sits on the floor in areas where leaks are most likely to happen. The moment water touches the sensor, it sounds an alarm — and many newer models will even send an alert to your phone.
They’re inexpensive, easy to set up, and require almost no maintenance.
Where Should You Put Them?
If you only use a few, start with the most common leak areas:
Under kitchen and bathroom sinks
Behind or near your washer
Near your water heater
Basement or sump pump areas
Around refrigerators with water lines
These are the places where small leaks often go unnoticed until damage has already started.
Why This Matters
Water damage is one of the most common (and expensive) issues homeowners face — and the key difference between a small cleanup and a major repair is usually how quickly the leak is discovered.
A simple early warning can save thousands of dollars… and a lot of stress.
My Homeowner Tip
Think of leak detectors like smoke alarms — you hope you never need them, but you’ll be glad they’re there if something happens.
For most homes, adding just a few of these devices can give you real peace of mind.
🎥 I recorded a short video showing the detector I use and where I recommend placing them — be sure to watch above!
As always, I love sharing small homeowner tips that help you protect your investment long after closing day.
How to Clean Your Dishwasher (Yes, It Needs Cleaned)
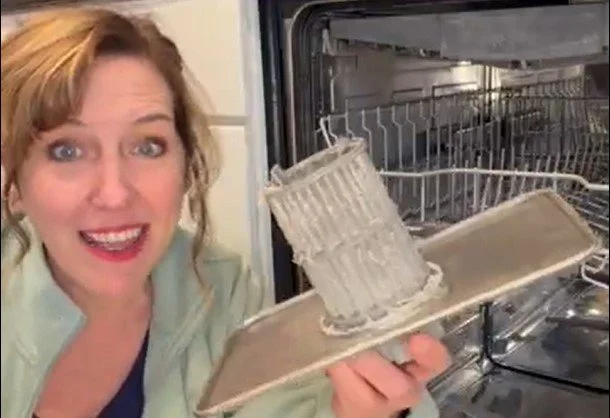
How to Clean Your Dishwasher (Yes, It Needs It)
Most people assume their dishwasher stays clean because it’s constantly washing dishes.
But over time, food particles, grease, and soap residue build up inside — and that can affect how well it works.
If your dishwasher smells, leaves spots on dishes, or just isn’t cleaning like it used to, this is likely why.
(I walk through the full cleaning process step-by-step in the video above.)
Why This Simple Task Matters
Cleaning your dishwasher isn’t just about eliminating odors — it helps:
Dishes come out cleaner
Reduce buildup that strains the machine
Improve efficiency
Extend the life of the appliance
This is one of those small maintenance tasks that can help you avoid bigger, more expensive problems later.
How Often Should You Clean It?
A good rule of thumb:
Light use: every 3–4 months
Heavy use or large households: every 1–2 months
If you notice smells or cloudy dishes, that’s your dishwasher telling you it’s overdue.
A Small Habit That Protects Your Home
As a homeowner, it’s easy to overlook the appliances you use every day — until they stop working properly.
Taking a few minutes to clean your dishwasher is a simple way to keep it running better, longer.
For more practical home tips like this, explore other posts here where I share easy ways to care for your home and protect your investment.
Does the Zip Tie Drain Hack Actually Work? I Tested It.
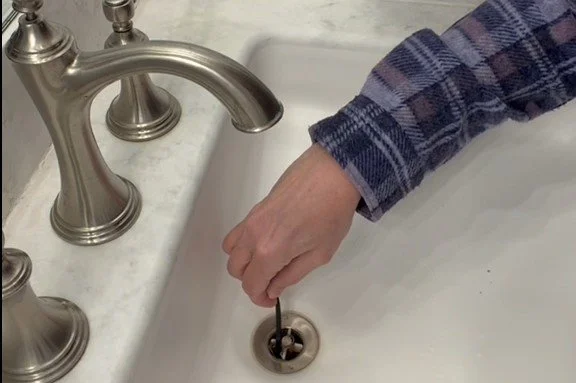
Slow drains are one of those homeowner annoyances that start small… and then suddenly you’re standing in a puddle of shower water wondering what went wrong.
I recently saw a “house hack” floating around that claimed you could use a simple zip tie to pull hair out of a clogged drain. No chemicals. No plumber. Just a zip tie.
Naturally, I had to test it.
The Idea Behind the Hack
The concept is pretty simple: Hair is one of the most common causes of slow drains, especially in bathroom sinks and showers. A zip tie with small nicks cut into it can grab onto hair and pull it back out of the drain.
It sounded almost too easy… so I gave it a try.
What I Used
A standard plastic zip tie (the longer the better)
A utility knife (to cut small notches)
A strong stomach 😅
What Happened When I Tested It
I slowly fed the zip tie down into the drain, twisted it gently, and pulled it back out.
And yes… it worked. Not only did it work — it pulled out some gunk along with the hair.
Was it a little gross? Absolutely. Was it effective? Also yes.
Why This Hack Is Worth Trying First
Before reaching for harsh drain chemicals or calling a plumber, this is a great first step:
It’s cheap (you probably already have zip ties)
No chemicals going into your pipes
Takes less than a minute
Can help prevent bigger clogs down the road
A Few Quick Tips
This works best for hair clogs, not grease or food buildup
Go slowly so you don’t scratch the drain or push the clog deeper
Rinse with hot water afterward to help clear anything left behind
Final Verdict
This one passed the test.
It’s not glamorous, but it’s a simple, practical home tip that actually does what it claims — and those are my favorite kinds.
If you want to see exactly how I did it (and the very real results), check out the video above 👆
How to Store Leftover Interior Paint So It Actually Keeps

If you’ve ever opened a can of leftover paint hoping to touch up a wall — only to find it thick, chunky, or unusable — you’re not alone. In most cases, interior paint goes bad not because of age alone, but because it wasn’t sealed properly after the first use.
A few simple steps right after you finish painting can dramatically extend the life of leftover paint.
Keep Air Out
Air is the biggest enemy of leftover paint. Before sealing the can, take a moment to wipe the rim and groove clean. Dried paint in this area is the most common reason lids don’t seal tightly, allowing air to slowly get inside.
For added protection, place a layer of plastic wrap over the opening before putting the lid back on. This creates an extra barrier against air and also helps prevent the lid from sticking shut.
When resealing the can, tap around the edge of the lid using a rubber mallet or a hammer with a block of wood. Avoid hitting the center of the lid — even pressure around the rim helps ensure a tight, consistent seal.
Reduce Empty Space
If there’s only a small amount of paint left, transferring it to a smaller container can make a big difference. Mason jars or paint saver containers work well and reduce the amount of air inside the container, helping the paint stay usable longer.
This is especially helpful for touch-up paint you may want to keep on hand for future repairs.
Label It Clearly
Before putting paint away, label the container right away. Include:
The room or wall it was used on
The color and sheen
The date it was purchased or used
These small details can save a lot of guesswork later when you need to make a quick touch-up.
Storing leftover paint correctly takes just a few extra minutes, but it can save you time, money, and frustration down the road. Check back for more practical homeowner tips designed to help you protect and maintain your home with confidence.
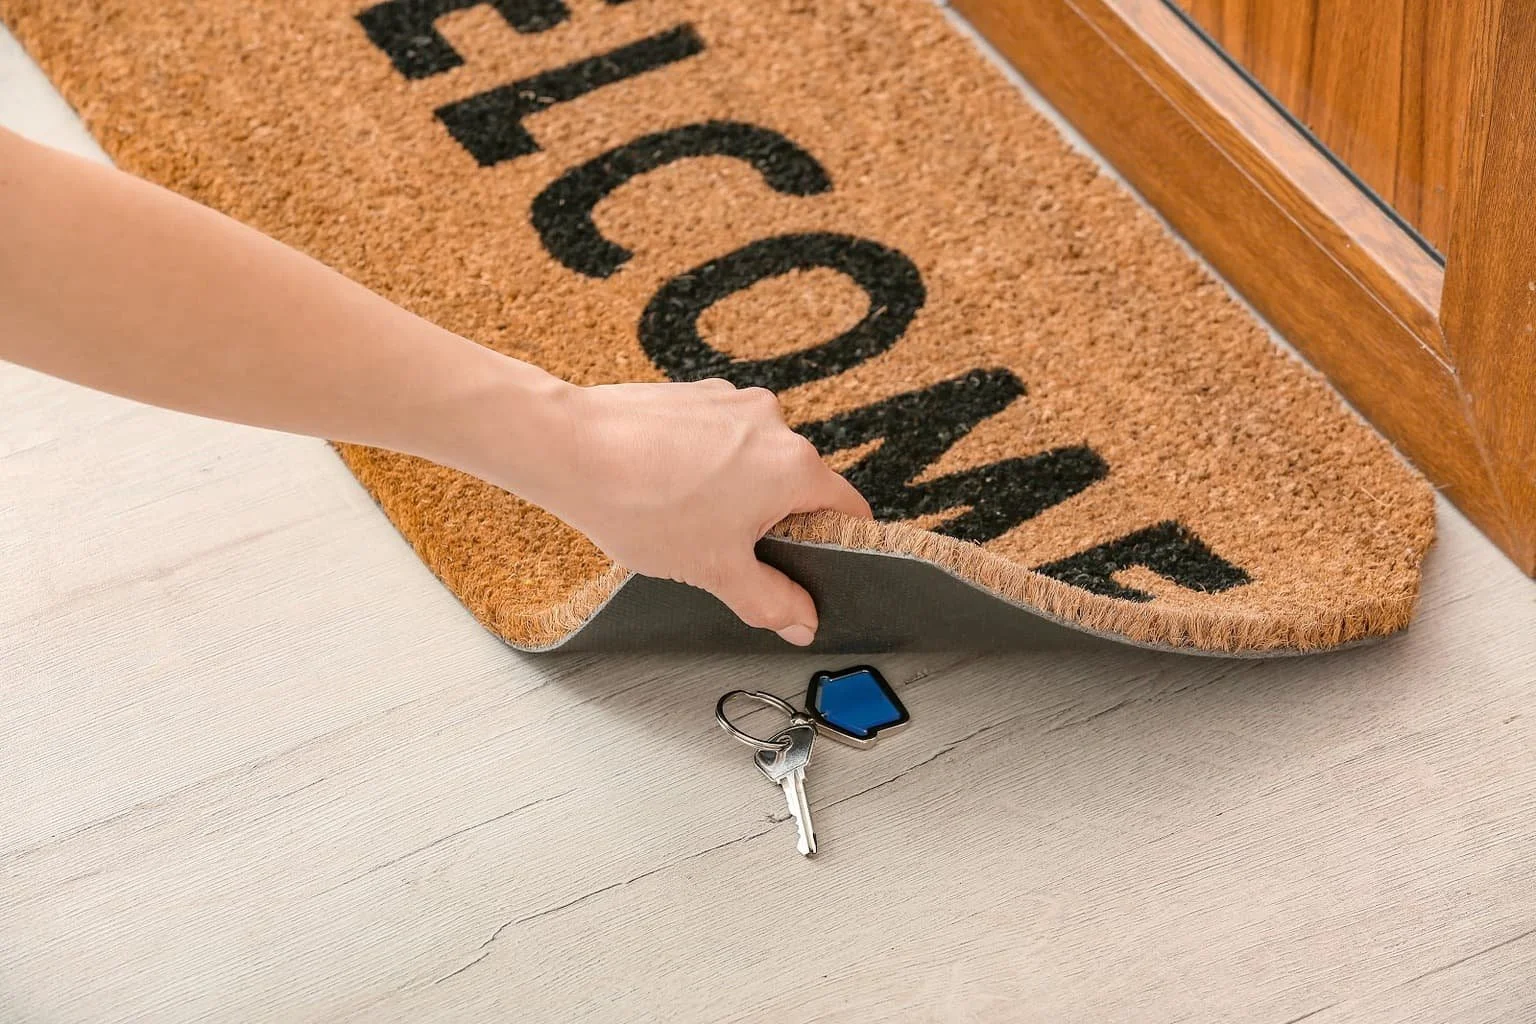
Should You Hide a Spare Key Outside Your Home?
Buying a home comes with a long list of “little decisions” you don’t always think about until you’re living there. One of the most common questions new homeowners ask is:
Should I hide a spare key outside?
The answer isn’t a simple yes or no — but there are some very clear do’s and don’ts every homeowner should know.
When Hiding a Spare Key Can Make Sense
There are situations where a backup key is helpful:
You live alone and want an emergency option
Kids or teens may forget keys
You travel often
You don’t have a trusted neighbor nearby
You haven’t installed a smart lock yet
Convenience matters — but security matters more.
Places You Should Never Hide a Key
If you’ve ever thought, “No one would think to look there,” think again. Burglars are very familiar with these spots.
Avoid hiding a key:
Under the doormat
Inside a fake rock
On top of the door frame
In a flower pot
In or on the mailbox
Anywhere inside an unlocked garage
These are the first places someone checks — and many break-ins happen without forced entry because of this.
Smarter (Still Imperfect) Ways to Hide a Key
If you decide to hide a spare key, follow three rules: distance, disguise, and difficulty.
Better options include:
A lockable key box with a code
A location away from the front door
A spot that isn’t visible from the street
A place that requires effort to access
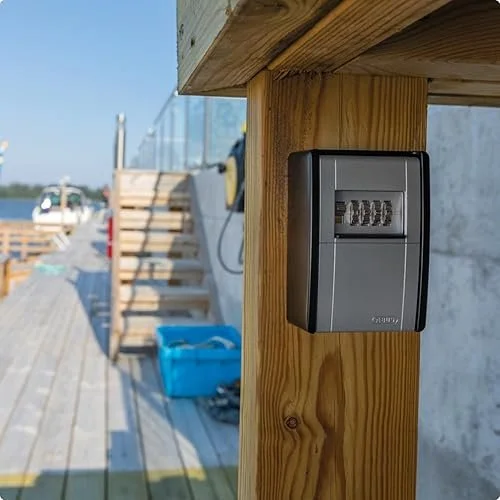
Rule of thumb:
If someone could find it in under 30 seconds, it’s not hidden well enough.
Better Alternatives Than Hiding a Key
If you’re open to safer options, consider:
🔐 Smart Locks
Custom codes for family, guests, or service providers
No physical key to lose or find
Easy to change codes anytime
👥 A Trusted Neighbor or Family Member
Often the safest solution
Especially helpful when traveling

The Bottom Line
Hiding a spare key isn’t automatically wrong — but how you do it matters.
✔️ Avoid obvious spots
✔️ Keep it away from entry doors
✔️ Limit who knows where it is
✔️ Consider smarter alternatives
Smart habits like this help protect your home long after closing day.
Just Moved In? The First Things Every New Homeowner Should Do
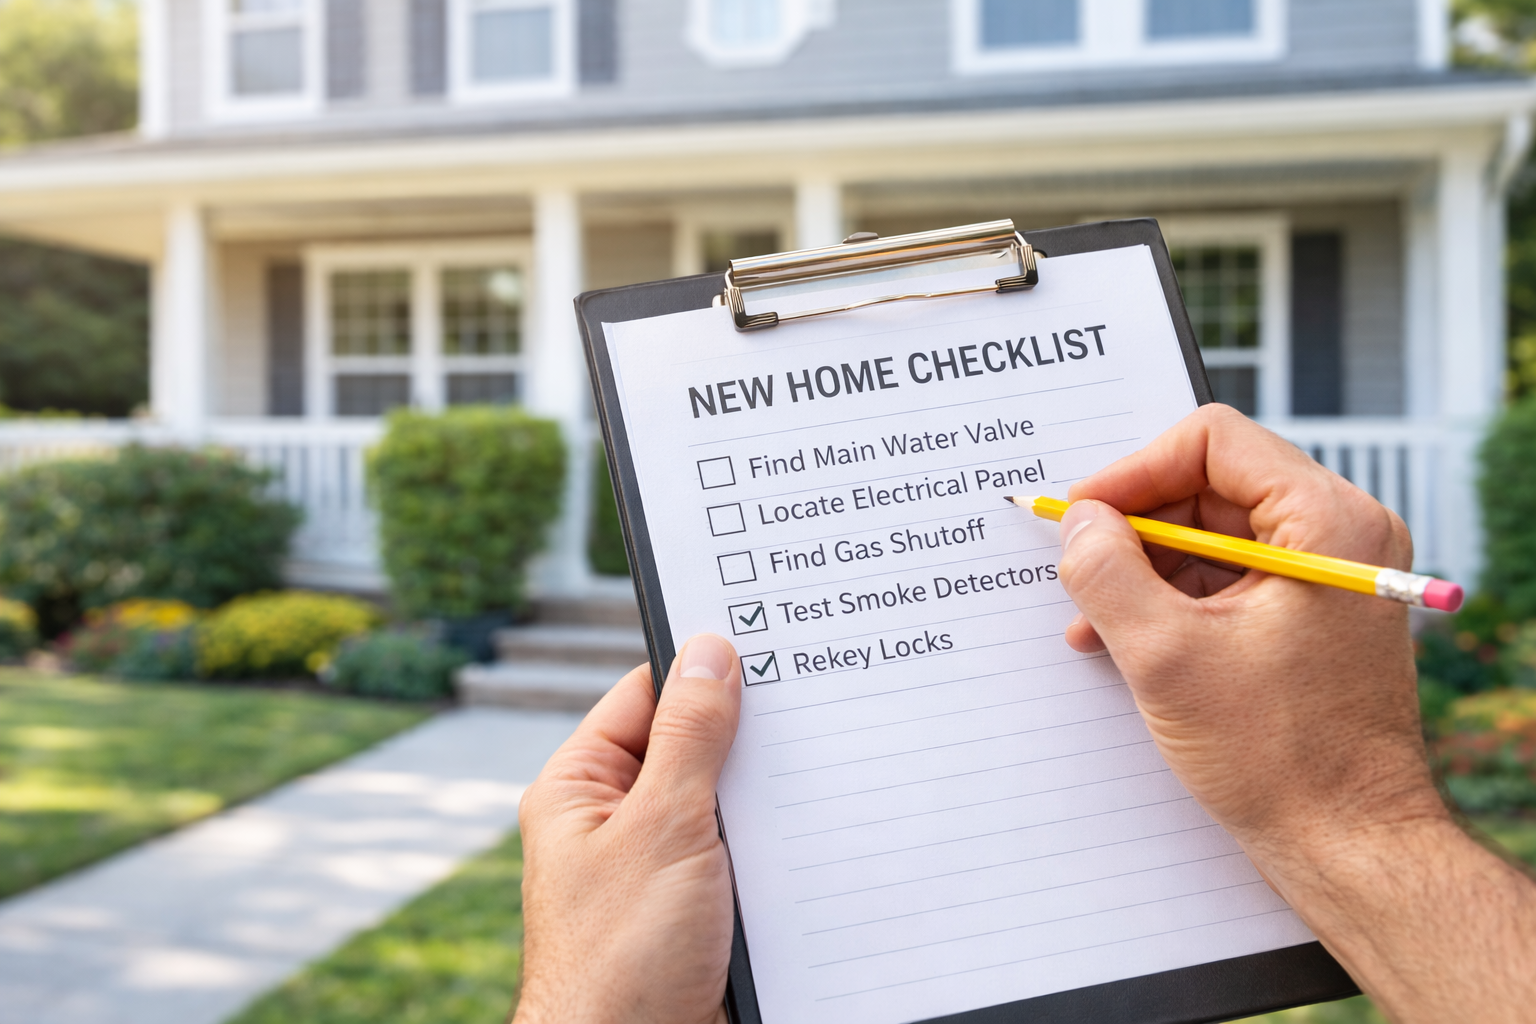
Buying a home is exciting—but once the keys are in your hand, there are a few important things you should do right away. Not the fun stuff like painting or decorating (that can wait), but the things that protect your home, your safety, and your wallet.
If you’re a new homeowner, here’s a simple checklist of first-week essentials that every homeowner should know.
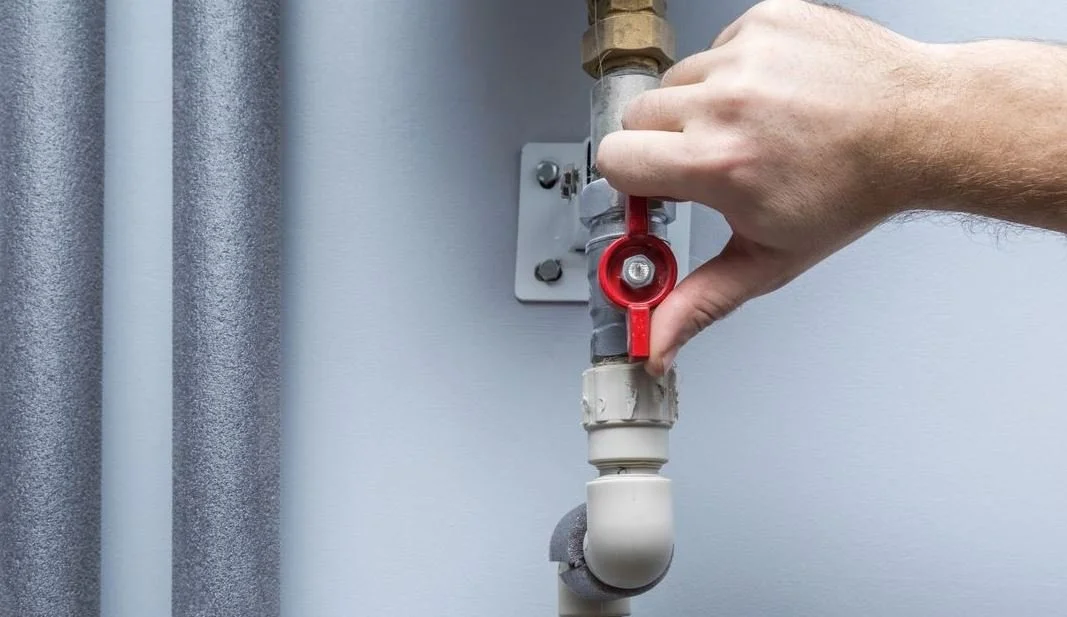
1. Find (and test) the main water shut-off valve
This is one of the most important things to know in your entire house.
If a pipe bursts, a washing machine hose fails, or a faucet starts leaking uncontrollably, shutting off the water immediately can prevent thousands of dollars in damage.
👉 Locate the main shut-off valve and make sure you can turn it.
👉 If it’s stiff or hasn’t been moved in years, consider having a plumber take a look.
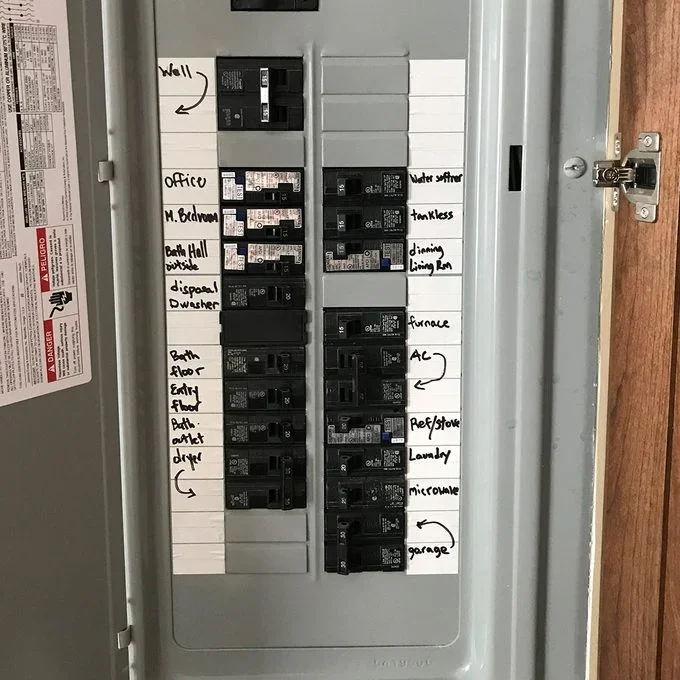
2. Locate and label the electrical panel
Find your home’s electrical panel and open it up.
Identify where it’s located
Test flipping a breaker so you know how it works
Clearly label each breaker if it isn’t already
In an emergency—or even during a simple repair—you’ll be glad you know exactly which breaker controls what.
3. Find the gas shut-off (if your home has gas)
If your home has a gas stove, furnace, fireplace, or water heater, you should know where the gas shut-off is located.
You don’t need to touch it—but you should know where it is and what it looks like. If you ever smell gas, leave the home immediately and call the gas company.
4. Test smoke detectors and carbon monoxide detectors
Don’t assume they work just because they’re installed.
Test every smoke detector
Test every carbon monoxide detector
Replace all batteries right away
If your home has gas appliances or an attached garage, carbon monoxide detectors are especially important.
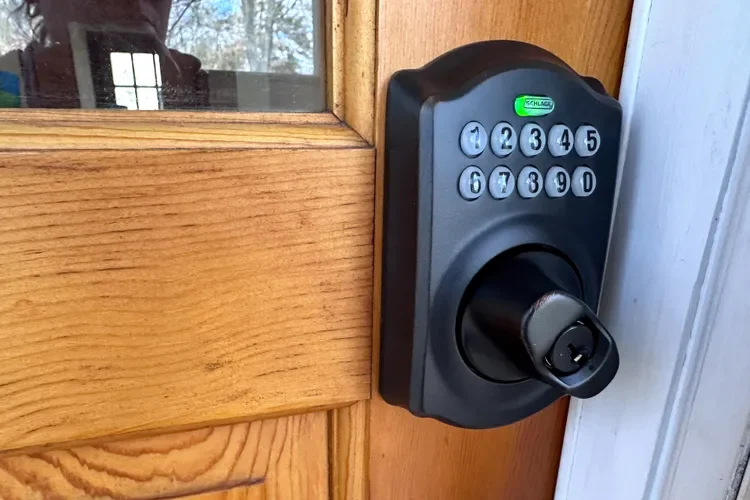
5. Change or re-key the exterior locks
You don’t know who may still have a key—previous owners, contractors, cleaners, or neighbors.
At minimum, re-key or replace the locks on:
Front door
Back door
Garage entry door
This is a small cost for a big boost in peace of mind.
6. Locate the water heater
Find your water heater and take a few minutes to learn:
Its age
Whether it’s gas or electric
Where the shut-off valve is
Knowing this now helps you spot issues early—and makes troubleshooting much easier later.
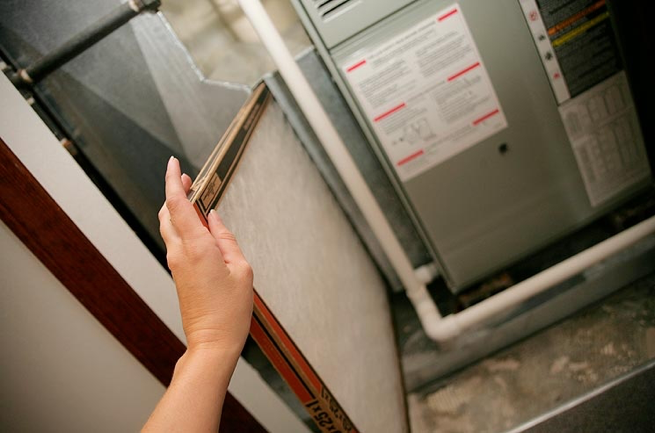
7. Find the HVAC system and replace the filters
Locate your furnace/air handler and thermostat.
👉 Replace the air filter immediately—many sellers forget to do this.
👉 Make a note of the filter size and set a reminder to change it every 1–3 months.
This improves air quality, protects your system, and saves on energy costs.
8. Locate and test the sump pump (if you have one)
If your home has a basement or crawl space, this step is critical.
Find the sump pump
Pour water into the pit to confirm it turns on
Check for a battery backup if applicable
A working sump pump can prevent basement flooding during heavy rain.
Final Thought
Homeownership doesn’t require knowing everything—but it does require knowing the basics. Taking an hour or two during your first week to handle these essentials can save you stress, money, and major headaches down the road.
The fun stuff can wait. Protecting your home comes first.
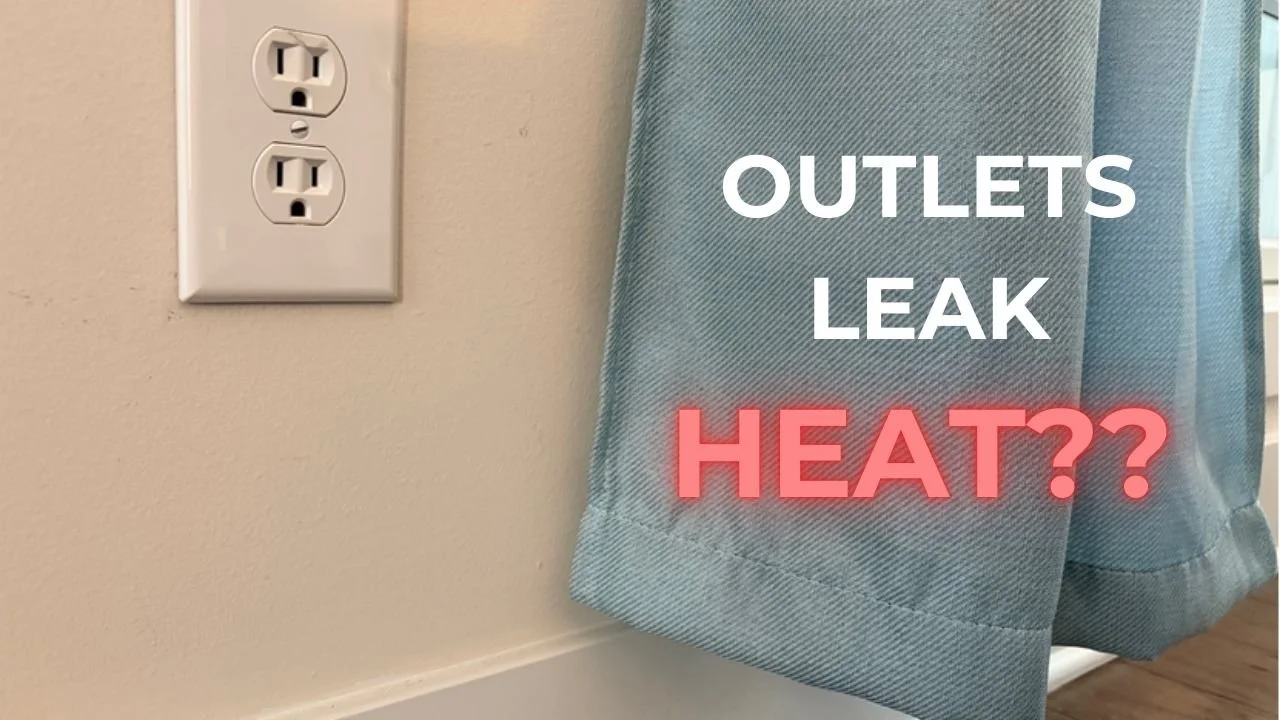
Yes, Your Electrical Outlets Can Leak Heat. Here’s the 5 Minute Fix.
Did you know your electrical outlets can leak heat?
In this short video, I show how foam outlet insulators can help reduce drafts — especially on exterior walls.
Outlets on exterior walls often allow cold air to enter through the wall cavity, especially in older homes.
In this video, I demonstrate a quick, inexpensive fix using foam outlet insulators. This simple upgrade takes about a minute per outlet and can help improve comfort and reduce drafts during winter.
This is one of the easiest energy-efficiency improvements homeowners can do with minimal cost and tools.